Categories
CENG795

Ray Tracer Part 3: Multlisampling and Distribution

In this part of the raytracing adventure, we are expected to implement multisampling and distribution. Or as I’d like to call it: Accelerated just so we can decelerate. This was a shorter homework with very little issues. Most of the issues were me trying to add unrelated stuff.

Preparations

Before everything, I added the new features to my classes and to my parser such as sample number, aperture size, roughness, etc. This part is quite trivial yet starting with this made the progress in the other parts way easier. In the previous homeworks, it was so slow when I had to return to the parser and the classes to add certain attributes to everywhere necessary.

I also created a new class AreaLight which inherits from PointLight and has normal,size, area, u and v vectors as additional attributes. I also now get irradiance and light position from the functions getIrradianceAt and getPos, respectively. This way my original computecolor remains unaffected and during debugging I can easily pinpoint where the problem is.

I also adapted my “drawpixel” function:

for (i=0; i < cam.numSamples; i++)
{
viewing_ray = computeViewingRay(x, y);
colors.push_back(computeColor(viewing_ray, 0, air,
cam.samplesLight[sampleIdxLight[i]]));
}

Color final_color = Filter(colors,cam.samplesPixel);
writeToImage(curr_pixel, final_color);

Sampling

The sampling is done within the camera class. The class initializes samples for pixels, camera, light, gloss and time all in the constructor (Currently it initializes these samples regardless if they are necessary). If there is only one sample, then all are initialized to 0,5.

Random Function: I used std::mt19937 and std::uniform_real_distribution as recommended in the homework pdf.

Sampling Function: I wrote a simple 2D sampling function. I also needed a 1D version for time. In both functions, following sampling types are implemented: Uniform, stratified, n rooks, multi jittered, random. By default I use multi jittered. The code for it is below:

case SamplingType::MULTI_JITTERED:
{
std::vector<int> cols(numSamples);
for (int i = 0; i < numSamples; i++) cols[i] = i;
std::shuffle(cols.begin(), cols.end(),gRanGenC);
std::vector<int> rows(numSamples);
for (int i = 0; i <numSamples; i++) rows[i] = i;
std::shuffle(rows.begin(), rows.end(), gRanGenC);
real spacing = 1.0 / real(numSamples);
for (int i=0; i < numSamples; i++)
samples.push_back({
(rows[i]+getRandom())*spacing,
(cols[i]+getRandom())*spacing});
}

Sampling Application: The application is within the raytracerThread class of course. I hold index vectors with length numSamples for each sample array within the camera, except the aperture samples themselves. I then shuffle all the index vertices for every pixel.

ViewingRay: During the computation of the viewing ray I simply removed the previous 0.5 added to the x and y and replaced it with the x and y’s of the samples.

Filtering

I implemented two types of filters: box and Gaussian. By default, I use Gaussian.

I initially made it so that my standard deviation function would return a colour instead of a float. Yet I then realised summing the elements and returning a float resulted in nicer results.

Initially I thought filter was the easiest and once it worked, it would work flawlessly. Yet throughout my trials for the cases below, I found out that sometimes my standart deviation would be too small and its inverse would be too big (infinity). This resulted in black circles (especially in cornellboxes) in places where colour between samples were not really different. To fix this, I clamped the square of inverse standart deviation to be in [0.1,1.0].

Motion Blur

I’m really glad I started with motion blur because it was easy to implement as a starter.

Application of Motion Blur: Every motion blur object is stored as an instance together with a new attribute named motion which is a vector. I also added a has_motion flag in order to quickly check if we should apply motion or not. The application of motion is simple. I did not even change the original intersection and normal functions. Just changed the “getGlobal” and “getLocal” functions that are called by them. These functions now take time as a parameter. Below is an example:

Vertex Instance::getGlobal(Vertex v, real time) const
{
if (has_motion && time > 0)
return (Translate(motion*time)
* (*forwardTrans)*Vec4r(v)).getVertex();
else
return ((*forwardTrans)*Vec4r(v)).getVertex();
}

At first I initialized it very simply, just a “time = getRandom()” line. I then applied the 1D version of various sampling types and it did make the result way less noisy.

Aperture

Then came the aperture. For this, I added a getPos function to the camera class, which returned the original position if it was a pinhole camera. I did not feel the need to add inheritance to the camera yet I might play with this idea later.

After the position was checked, came the manipulation of the viewing ray direction. For this purpose, if the aperture size was bigger than zero, I added these lines:

real tfp=cam.FocusDistance/dot_product(dir,cam.Gaze);
viewing_ray.dir = (cam.Position + dir * tfp)
- viewing_ray.pos;

This was the easiest part that needed the smallest amount of debugging for me. I just initially forgot to multiply by the aperture size while computing the camera position.

Area Light

Now this, this took the longest because I kept misunderstanding the logic. It is funny because while debugging I only had a couple of irradiance computing lines and that was it. Yet I still managed to spend hours debugging.

For arealight to work, I wrote a get ONB function first (while reading every step, please assume I did do something wrong and had to debug, it will be too much if I mention it every sentence). I then wrote the get position function. Then came the getIrradiance at function. It was so hard to get this function right. I also realized while separating the irradiance function, I mistakenly added the *cos_theta to this part instead of the actual diffuse and specular terms. This resulted in a brighter scene especially for point lights since for specular term, we do not actually multiply by cos_theta.

I also realised that the reference pictures had two-sided area lights and simply inverted the cos_light if it was negative. Didn’t think much of it.

Also, thanks to the arealight being visible on the cornellbox scene, I managed to see a flaw in my multi jittered sampling function because the light seemed warped and not square.

Glossy Surfaces

Oh this was a breeze after area lights. I just used the getONB function and wrote this simple function:

void Ray::shiftRayBy(std::array<real, 2> samples, real roughness)
{
if (roughness != 0.0)
{
std::pair<Vec3r,Vec3r> onb = getONB(dir);
Vec3r u = onb.first;
Vec3r v = onb.second;
dir = dir + ((v*(samples[0]-0.5) + u*(samples[1]-0.5)) *roughness);
}
}

Because no human is without any mistakes, and apparently I’m as human as it gets, of course I managed to do this wrong as well. I initially called the ONB function with respect to the surface normal, not the direction of the ray, i.e. getONB(n). This did not cause any visible issues for meshes but the metallic sphere within the cornellbox seemed obviously off.

Results

Here is the tap 🙂 I did see some very slight differences in the water but it was so hard to track since the reference was a video. I’m not even sure whether I saw it wrong or not. I tried to turn the mp4 back into frames with the command below but I do not think it replicated it perfectly as there were artifacts and the pngs did not exactly correspond.

ffmpeg -i jsonFiles/hw3/outputs/tap_water/tap.mp4             jsonFiles/hw3/outputs/tap_water/tap_%04d.png
Mine is on the left (The artifacts were more visible when I zoomed more, its hard to see here but it is more blurry)

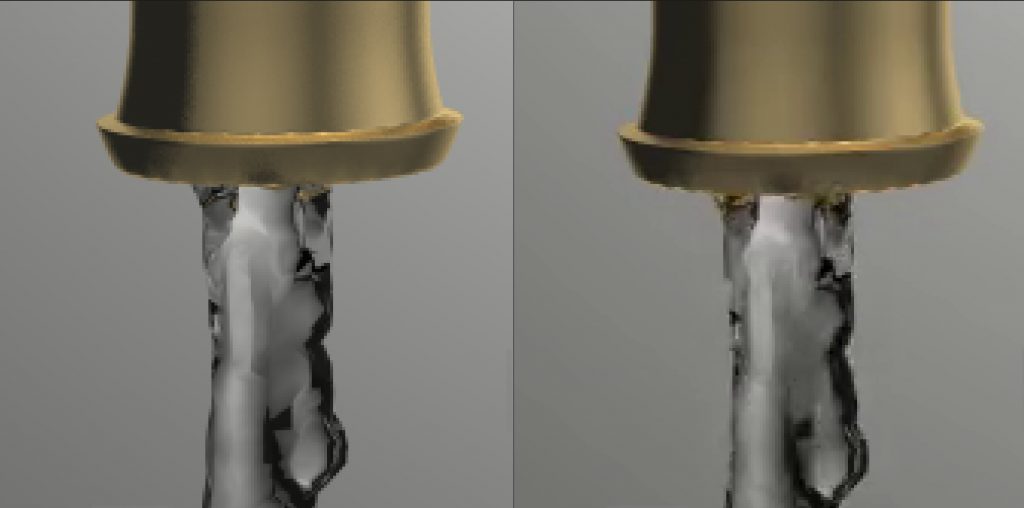
There seems to be slight difference at the mouth of the tap.

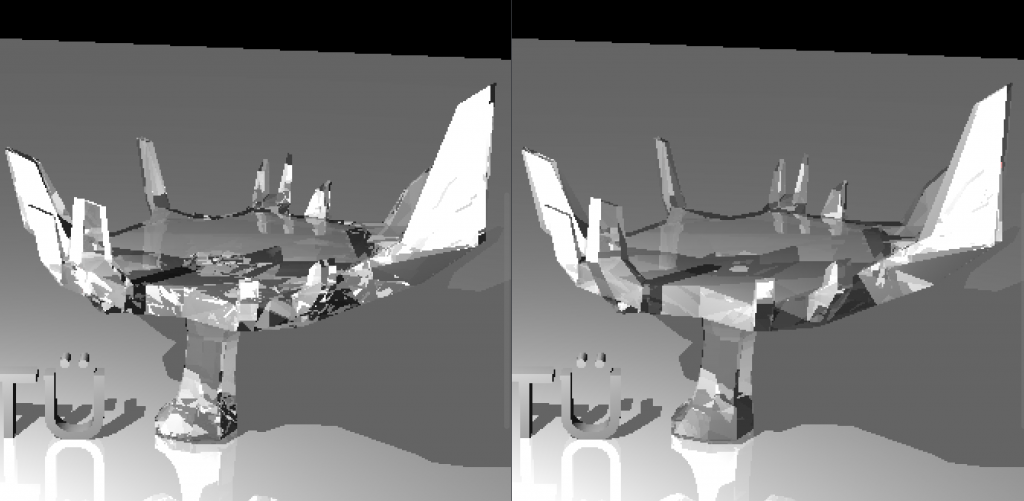
Above is the difference between my glass and the refernece, the one that is blacker in the bottom of the glass is mine.

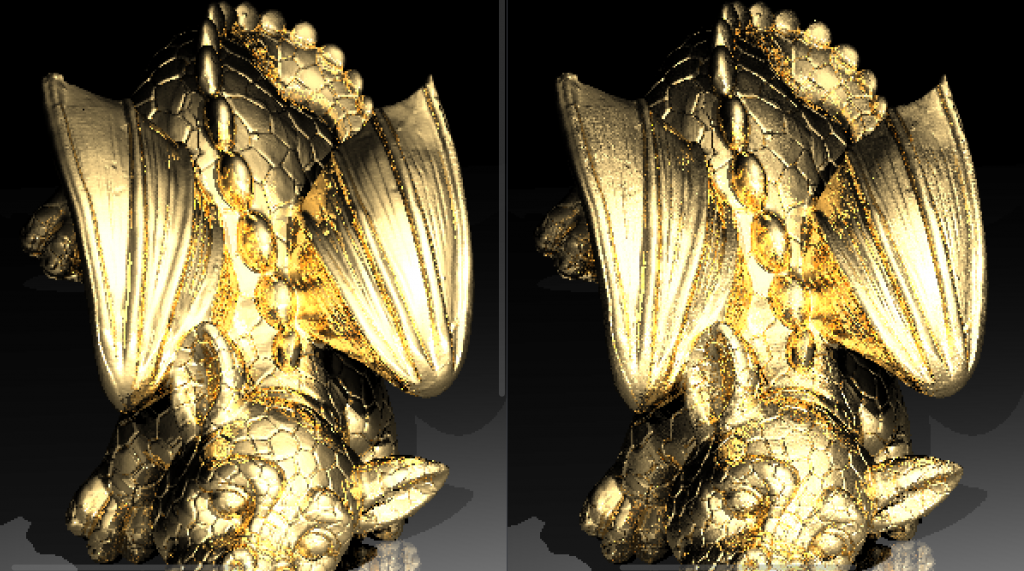
Also, the other dragon also shows some dielectric issues:

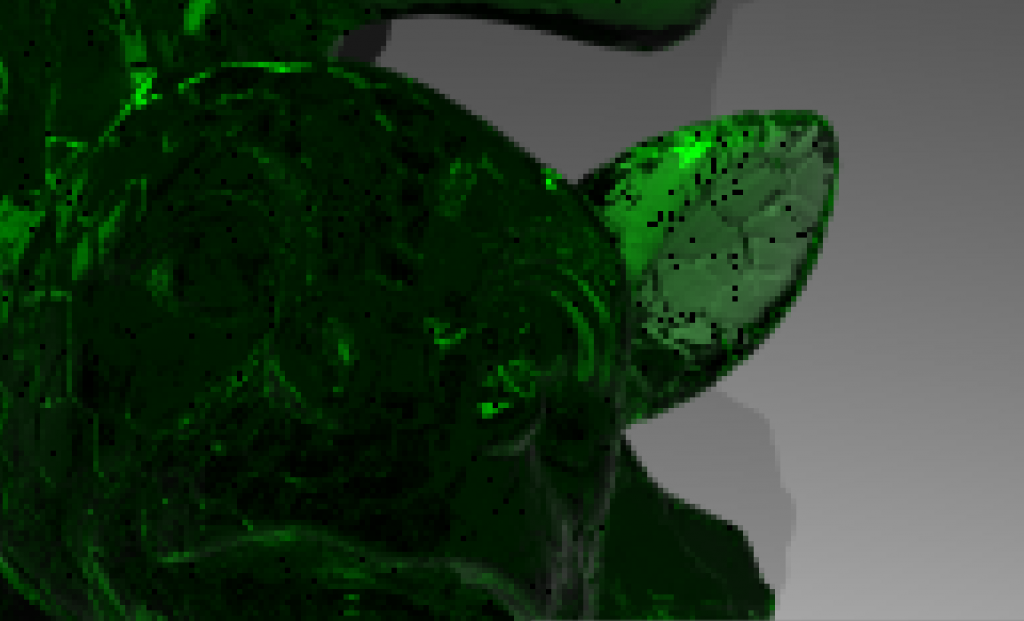
I tried to fix this problem, it is black beacuse of reaching the depth limit but could not really fix it. I am so tired of dielectrics but I guess I still need some debugging for them.

Final Notes

I have a few more things I want to do. First of all sometimes my mesh bvh build takes too long since initially I was working on object bvhes. I want to search for ways to make it faster. Moreover, I need to do a cleanup (as I always do after a submission). Other than that (and my dielectrics) I am currently really content with the way my code is. It is compartmentalized and very easy to develop.

Categories
CENG795

Ray Tracer Part 2: Getting Faster

In this part of the course, the whole point is to make the raytracer faster. I did not do as best as I could, but I realized that while writing this blog. I am also not going too hard on the optimization part to have a structurally sound and modular code, which does take most of my time :’). In total, I implemented bounding boxes, bvh, proper multithreading and back culling. There is also transformations and instancing, which is what I will be talking about first.

M4trix

I started with implementing my own 4×4 matrix and 4×1 vector functions and classes. My M4trix class holds a 4×4 double array and overloads multiple operators as well as having its own determinant, adjugate, inverse, transpose and Identitfy functions. At the beginning I made the mistake of only initializing diagonal values for the identity matrix, which led to me having garbage values for the rest.

I do not hold any 4×1 vectors, instead I create them only for matrix operations.

Transformations

The transformation class inherits from matrix. It has an extra m4trix for normal transform. Its functions are virtual gettransformationtype and virtual inverse.

The other transformation types inherit from transformation and implement the virtual functions.

  • Rotate: axis (ray), angle (float)
  • Translate: x,y,z (all float)
  • Scale: center (vertex), x,y,z (all float)
  • Composite (the one used the most)

For lights and camera, the transformations are directly applied at the parser. For objects, instances are created.

Transformations worked like magic, had no problems there.

Instancing

Instance inherits from object, so has its own get normal, check intersection and get object type functions. It also has a pointer to the original object, pointers to forward and backward transformations.

Both transformations and their normal transformations are computed at the initialization and are Composite by nature. I did not add a differentiation if there is a single type of transformation for the object or not, I precompute the forward and backward transformation together with normal transform matrices either way. The instances can be used for two cases:

  • An object initially defined with transformations:
    • This case is handled because instances can use the original object without transformations, so directly computing the transformed object and storing that requires adding the backward transformation of said object to the transformation of the instance. That is still doable yet the need to add new vertices for this purpose does raise a new memory problem, which is counteractive to the original idea of the instances.
    • For this instances, we create a new object in the heap in constructor and delete it in the destructor. The original object is not within the objects deque. (Objects is now a deque to not have problems with referencing due to one-by-one addition of the instances)
  • Mesh instances:
    • For this case, if it says reset transformation, then the pointer points to the very first original object. If the transformation will not be reset, then the pointer points to that object with that id, regardless if it is an instance or not.

My main trouble was with parsing the instances and putting them into my scene struct. After that was done, since I had no issues with object rendering or transformations, there was no problem left. Also thanks to inheritance and my virtual functions, I did not even change any code in the original raytracerThread class.

Bounding Box

After I handled all the issues for instancing and transformations I then defined a new class: BBox. It has two vertices, vMax and vMin that holds the boundaries of an axis-aligned box, and three functions:

  • Is within: To check if a vertex is within the bounding box.
  • Intersects: To check if a ray intersects with the bounding box
  • Get area: used for surface area heuristics.

I then added a bbox attribute to the object class. And for all intersection checks, it first checks if the ray intersects with the bounding box.

For instances, I automatically had two bounding boxes, one of the original (local) and one of the instance (global). This made local and global bounding box switches at bvh almost automatically.

The class also implements its own get global and get local functions for various structs.

BVH

Now that everything is ready, it is time to get faster. I wrote a BVH class that will create the linear node tree and traverse it. The way I did it is not the most optimized, I have to admit. I put meshes into the nodes. Yet still I got a very big improvement together with bounding boxes. I will continue to improve this part throughout other homeworks but this is how it is currently. Apparently, it is very easy to overlook such things when focused on meeting the deadline.

I had also wanted to try other acceleration structures, yet I did not have time to implement them before the homework deadline.

I did three ways of choosing the pivot: Middle, median and Surface Area Heuristics. As expected, SAH works the most efficient for now. (I later implemented triangle based BVH at the end of this blog to see the time)

I also only included intermediate nodes with two childs. If a node had one child, I recomputed with a new axis. If for all three axes the node still cannot be divided to two and objCount > maxObjCount, I divided it to two at the “start+maxObjCount”th index and continued.

Multithreading

I was already doing multithreading in my previous homework but it was row-based. I added a new function to be able to do it batch-based. My batches are 16×16 unless they exceed image resolution limits.

Now, I also had race conditions when I changed some functions without realizing and started to see black dots on the screen. This was due to my meshes holding the triangle id which they had intersected with when checkIntersection function was called. I thought making the scene constant would prevent such issues, but I forgot I was holding pointers to the meshes. I then fixed it by adding a triangle ID to my hit record and passing it as a parameter to getnormal. I do believe this can be handled better.

Fixing Other Issues

  • Backward Culling: I had implemented backward culling in the previous homework, yet it needed to be improved. I now disable back culling for dielectrics and shadow testing for obvious reasons.
  • Vertex Normal Computation: My code now checks if ply files have vertex normals in them, and if they do, automatically gets them and assumes smooth shading.
  • Dielectrics: In the previous homework, I had issues with my dielectrics, turns out it was due to my very very flawed logic where I forgot to refract the reflections within the dielectric. I fixed that and it works perfectly now 😀
  • Near plane taken as int: In the previous homework I also had a difference between my chinese dragon and the reference png in which my dragon would seem further away than it should be. Turns out I was taking near plane with std::stoi instead of std::stod.
  • Makefile: Since my code got quite big with various files, I extended my makefile to only recompile the updated files. Currently, this does not work as well for me since I hold my configurations as macros in a header and my makefile is unable to update based on macro differences.
  • Logger and Automatic file renderer: Now that we have too many files, there is no way I am giving all that arguments by hand. So I wrote a function to render every json file within a folder as well as a logger that writes the time + total time. It is a simple and quite uneffective logger, embedded within the main raytracer class (this class calls the raytracerthread classes) as I am only interested in logging the time and nothing else.
  • Camera Scaling: For scaling I needed to update near distance by the scaling factor. I realized this after the submission, and I did not update my submission after the deadline so scaling doesn’t work in that code.
  • Deoptimizing the code (?): I did make my code way worse (x3 worse) while trying to optimize it without realizing at one point. I learned that making bounding boxes more complex only makes it worse. I did optimize traversal but currently it does not have any effect since my traversals are quite minor due to mesh based traversal.

Results

I did not put any photos since it is not about the visuals mostly. Besides, my results are currently very close to the references, if not identical. Instead, here is my now public github repository and two videos: github.com/aysucengiz/CENG795

Youtube decided it would be shorts and not a normal video ¯\_(ツ)_/¯

Timings

Okay so just to be able to add it to the blog, I quickly implemented triangle based bvh for each mesh. I did this by adding a bvh to mesh class. I initialized it together with the mesh, and simply called the traverse function. The visuals are unaffected. This is not in the submitted code though, I just was too curious not to put it to the blog. I added the times like the following: (parse time) + (draw time)

Honestly, I did expect it to be very good but this left my jaw open. I was struggling to draw every scene within these past three days.

SceneDraw (old)Draw (no triangle bvh) Draw (yes triangle bvh)
Chinese Dragon0.015s +
21m 56s
1.142s +
11m
3.671s +
0.253s
Car Smooth0.014s +
37.4 s
0.012s +
2.297s
0.037s
0.286s
David0.149s +
5m 15 s
0.273s+
37 s
0.273 s
Ton Roosendaal Smooth0.11s +
6m 1s
0.096s +
50.025s
0.283s +
0.308s
T-rex Smooth2.185 +
3h 48m
1.577s +
1h 11m
10.725s+
0.717s
Other Dragon1.841s +
1h 46m
2.191s +
33 m
8.077s +
0.627s
Lobster1.276s +
+8h
1.264s +
~4h
7.924s +
6.24s

Categories
CENG795

Ray Tracer Part 1: Starting with the Base

This is the first blog post for my CENG795 journey, where I will be coding a ray tracer from scratch and improve it as we learn new things in the class.

Data Structures

I decided to start with defining the data structures. And created a file to include all the minor and major structs except the ones requiring objects which are listed below. I did vectors and vertices two different types to be able to track whether I made a mistake in my computations. For example: Vertex – Vertex = Vec3f. If I somehow got confused and assigned it to a Vertex my code would not compile since I did not override operator – for that case. I am very clumsy so this precausion is needed to prevent annoying mistakes.

Enums: MaterialType (none, normal, mirror, conductor, dielectric), ObjectType (none, triangle, sphere, mesh, plane), ShadingType (none, smooth, flat)

Base types: Color (3 floats), Vec3f (3 floats), Vertex (3 floats), Ray (Vec3f and Vertex)

Complex Types: Cvertex, i.e. composite vertex (id, vertex and normal vector), Camera, PointLight, Material.

Object: Object (abstract class), Triangle, Plane, Mesh, Sphere

The object class has id, and a reference to a material. It also has three virtual functions that are: getObjectType(), checkIntersection(ray, t_min, shadow_test), getNormal(vertex).

Ray Tracer Types: SceneInput and HitRecord.

I will talk about parallel computing later, however SceneInput is the constant struct that is read by all the threads and never written on once a scene is parsed. It contains all the information within the json file, and the objects in a single objects vector. It also stores some precomputed values that are common for every thread.

Every object type has their vertices as references to the Complex Vertices vector of SceneInput. This was initially fine as I first initialized the vertices vector then the objects in my parser. However, became a problem with the ply files as I later added new vertices to my vector and when the vector got too big, it reallocated. I solved this by turning the Vertices vector into a deque. This was not an issue as I only use the vertices from within the objects and not directly from the list.

Hit record is as it sounds, holds the necessary information when our ray intersects with (or hits) an object. It includes an intersection point, a normal and an object pointer. I also added a mesh pointer just in case. Because when a mesh intersects with an object I only hold the triangle which does hold the necessary information from its mesh, so holding the mesh and the triangle separately is usually not needed.

For all these types, I overrode the necessary operators and the << operator. I also added: clamp, exponent(Color), dot product, determinant, magnitude, normalize, isWhite.

File Management

This is the section where I talk about my parser, which will be short since the data structures section talks about most of it. I will also write slightly about writing the result to the file.

Parser: I wrote parser as a namespace instead of an actual class. Its only used function from outside is parseScene, name self explanatory. In this function we first get the json data from file (using nlohmann json), then get small information such as background color and max recursion depth. If these are not given in the file they are initialized to their default values. Then the cameras, the lights, materials, vertices and objects are written to the sceneInput struct. For meshes using ply files, I read the files using happly library and add the new vertices. I also check for degenerate triangles and handle lookat cameras and vertex orientation (all given as “xyz” for our cases). For materials, if everything is given as 0 value, I set the type of that material to none and skip objects with material as “none”.

Writing the result: I initially used the function given last year to us for the raytracer, which worked for small scenes but was unable to write very big chunks of data. I then made it so that the ppm file format was P6 instead of P3, and wrote using fwrite which worked seamlessly. However, as it was recommended in the homework pdf, I wrote another function using the stb library, which worked as well.

Ray Tracer

For the main ray tracer, I have two classes: RayTracer and RayTracerThread.

The RayTracer is the class initialized by the main function and holds the scene information. It has the functions parseScene(input_path), drawScene(camID) and drawAllScenes(). The user should first call parseScene function, then draw scene.

ParseScene simply clears the vectors in the scene, calls parsers parseScene and sets the number of cameras, objects and lights.

DrawScene first initializes some common values in scene. After this step, the scene is information is never modified until another draw or parse scene function is called. I first create the list of raytracers made up of RaytracerThreads and then call them parallel.

The RaytracerThread is where the magic happens. It holds references to the camera and the scene which are both marked as constant. It also holds a static int to count the number of done threads. I sometimes printed this to see how long was left for especially complex scenes. The computeColor function is the main function of this class. It first checks for max recursion depth, if the depth has not been reached, then it checks for object intersection. If an object has been hit, then does reflection if it is a mirror or a conductor, does refraction if it is a dielectric. We then check for shadows and if the point does not fall under a shadow its color is written.

The only part I could not solve was the dielectrics, I am doing something wrong I assume but could not find it until the due date.

Mine are the ones on the right. It is more obvious with the science tree where I lack some details, I believe especially the reflections within the dielectric have some problems.

Moreover, with the other dragon scene mine turned out to have a slightly “dirtier” look. (Again, on the right). I could only render this once since it takes too long, therefore I could not test on it. And I believe since easier scenes are not as detailed I was not able to catch the difference. But I was not able to catch any other significant difference in other scenes. (I guess it is the difference between smooth and flat shading)

Mine is on the right, the river has reflections
Mine is on the right, it has reflections. The materials are not listed as mirrors but they have mirror reflectance so I don’t know if I am doing something wrong.

I have reached my space quota so I cannot add the other pictures. Most of the scenes seem the same except some additions such as mirrors. The berserker has slight shading differences. For some reason my chinese dragon seems further away than it should be. I added the two as pictures to a drive folder: https://drive.google.com/drive/folders/1xIVvd5WrOO7IWe1ksRcW1p_JNYF945gA?usp=sharing

I did not see any significant difference in the other scenes 🙂

Tests & Times

Below are the times of the scenes with and without backface culling. I also implemented a logging feature for this reason, but it was not in the submitted homework so I will be talking about it in the next part.

Both cases were done while my computer was in the same state as much as possible. I also run my raytracer via WSL 2.

NameParsing Timew/o Cullingw/ Culling
Science Tree0.003s4.32s1.77s
Science Tree Glass0.007s9.46s5.53s
Bunny0.006s3.11s1.15s
Bunny w/ plane0.008s39.03s27.8s
Chinese Dragon0.783s32m 16s21m 56s
Low Poly Scene Smooth0.015s24.72s17.31s
Tower Smooth0.012s22.83s18.89s
Car Smooth0.014s53.2s37.4s
David0.149s7m 51s5m 15s
Raven0.011s36.21s24.1s
Utah Teapot0.051s2m 16s1m 37s
Other Dragon1.841s2h 28m1h 46m
Ton Roosendaal Smooth0.11s7m 12s6m 1s
T-rex Smooth2.185s5h 0m3h 48m

The lobster took longer than expected so I do not have a w/ culling version of it, it took more than 8 hours.